PostNL’s Journey to BYOIP on AWS: Managing Costs and Control with Custom CIDR Ranges

The AWS Center of Excellence (AWS CoE) team at PostNL is dedicated to provisioning and establishing foundational infrastructure, enabling self-service engineering teams and Cloud Service Providers (CSPs) to efficiently develop and deploy business-critical applications according to the best practices.
We also manage the centralized network configuration as part of PostNL’s shared infrastructure, ensuring a reliable and scalable foundation for all AWS-based initiatives.
The call for change in AWS Networking
We started this endeavor when AWS announced a change in the license policy regarding the costs of IPv4 IP addresses.
Like many organizations, we relied on AWS public IPs to connect our centralized NAT Gateway to the outside world. To avoid increasing costs and establish greater control over our network configuration, we chose to adopt a Bring Your Own IP (BYOIP) strategy, leveraging our own CIDR ranges.
We noticed this wouldn’t be a straightforward migration. With potential impacts on internal teams and third-party partners who relied on our IP addresses, this would be a balancing act between cost-saving measures and ensuring uninterrupted connectivity.
Initial investigation
To identify how much cost we could save, we enabled IPAM* in our organization.
*Amazon VPC IP Address Manager (IPAM) is a VPC feature that makes it easier for you to plan, track, and monitor IP addresses for your AWS workloads. You can use IPAM automated workflows to more efficiently manage IP addresses.
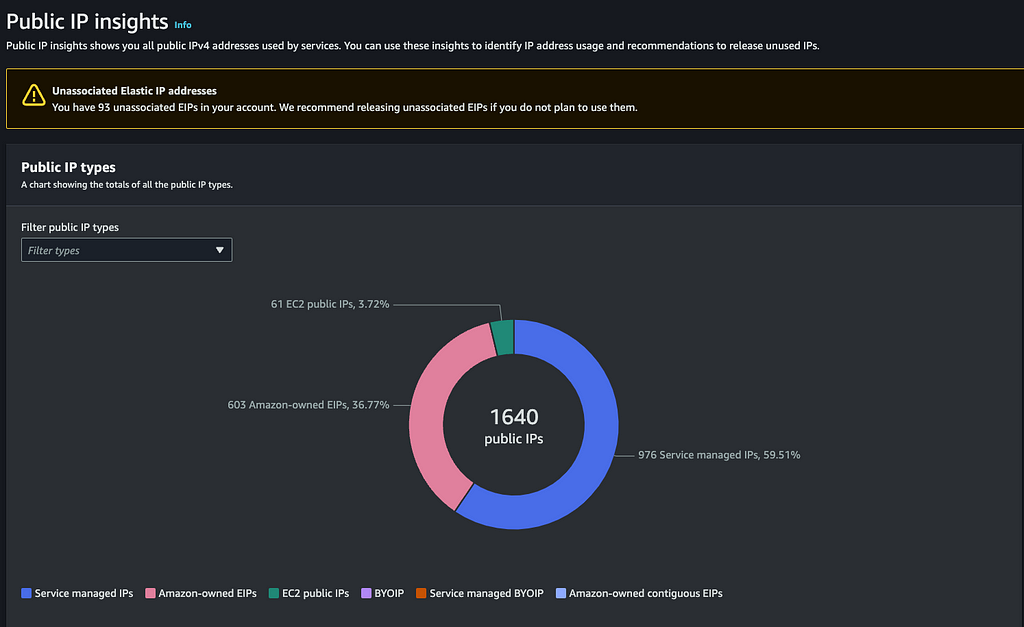
With IPAM it is possible to get an overview of public IP addresses used:

Since IPAM also allows you to see how the IP addresses are used across the organization, we noticed that we had a lot of NAT gateways. This also allowed us to save some costs by centralizing the NAT gateways within the entire organization.
A little bit of context around that: AWS CoE has created three landing zones. One landing zone is our Cloud Native landing zone, and that one is managed by the AWS CoE Team. Two other landing zones are beeing managed by CSPs. They were managing AWS accounts before the AWS CoE existed and they are responsible for managing the accounts and setup within those landing zones. On those accounts, we found a lot of NAT gateways.
The number of AWS IP addresses used in combination with the large number of NAT gateways (+400) gave us enough motivation to proceed.
Planning: What BYOIP would mean for our NAT Gateway setup
From the start, we set two priorities: Minimize downtime and proactively address potential disruptions for all connected parties. With these goals in mind, we sketched out a plan that would maximize preparation time for all parties involved.
-
Migrating the BYOIP to AWS
We moved a part of the CIDR range to AWS following this documentation: Onboard your address range for use in Amazon EC2 — Amazon Elastic Compute Cloud.
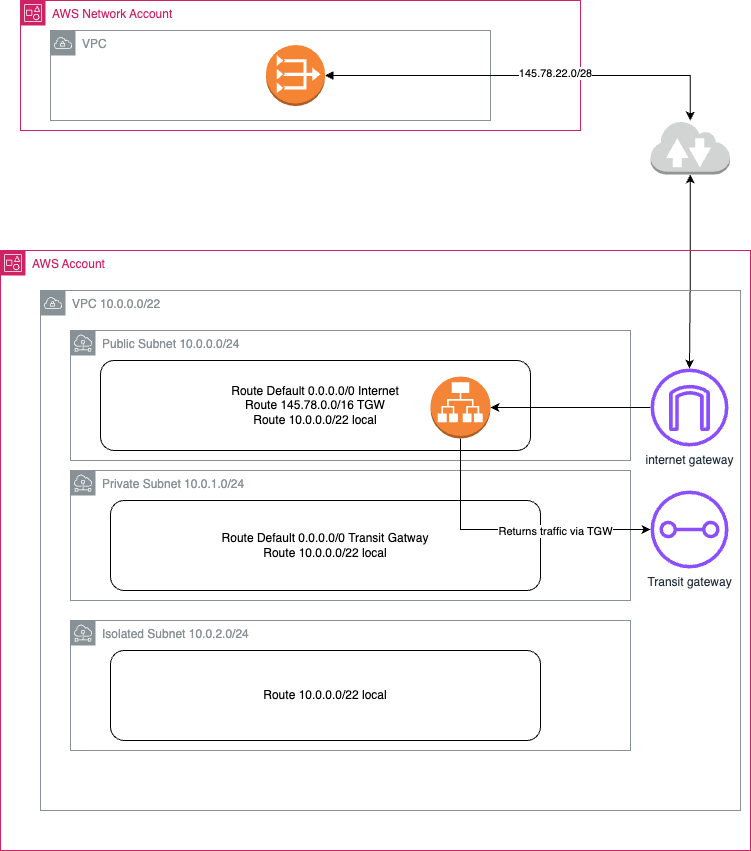
You can see in the RIPE database that we moved e.g. 145.78.22.0/24 to AWS and it’s being advertised on AS16509 (AS number that belongs to AWS) and it’s connected to several TIER 1 ISPs. e.g.z.
Moving a public CIDR range that is privately used triggers some adjustments on the routing. Within PostNL we are using BGP. -
Adjust routing
We had to adjust routing so the connected parties (VPN, OnPremise, Core Network) would use the internet to reach the CIDR block that we are going to use on AWS. -
Align with consulting partners
For accounts managed by consulting partners and making use of the centralized NAT gateways that were created on an Egress VPC that is attached to the Transit Gateway, they also needed to adjust the routing. -
IPAM advanced tier
To share BYOIPs with other accounts in an organization we needed to enable the IPAM advanced tier. We also monitored the costs of IPAM since the pricing model has a fee on all active IP addresses that are being managed by IPAM. PostNL has a lot of accounts and when we enabled it the bill of IPAM went up quite hard. It was costing us $120 a day since it was also charging us for the private IP ranges that existed in our organization. That is why we turned back to the standard tier.
We created a support case with AWS to ask if it was possible to share a BYOIP range using RAM without IPAM. AWS confirmed this is not possible. Additionally, we learned that private IP ranges cannot be excluded from IPAM management, even though we were not using IPAM for this purpose. - Configure IPAM pools and share the pools via RAM
-
Update the Egress VPC
To use the elastic BYOIP IP addresses, we had to update the egress VPC allocated IPs. Since we are adding a lot more environments to use our NAT gateway, we also added alarms to run monitoring on the usage of the number of connections.
Once we mapped out the migration plan, it was clear that good communication would be the key. We also had to communicate about eventual whitelisting that needed to be changed by parties based on the current AWS IP addresses toward the new BYOIP range used by the NAT gateway.
The communication strategy
PostNL has a policy that goes against whitelisting of IP addresses, but we know that some parties were still depending on this. We just did not know who. For that, we needed help from another team inside PostNL.
The API Management Platform owned by the #include team is responsible for giving both external customers and PostNL internal teams the framework and tools they need to use our internal applications and services directly. That is why the #include team played a big role in the communication strategy.
We needed every internal team — from DevOps to Customer Support — on board and prepared for the change. But even more importantly, we had to coordinate with our third-party partners. Some relied on the public IP addresses whitelisting, meaning any gap in preparation on their end could lead to connectivity issues.
With the help of the #include team, we reached out to teams and third parties 3 months early, explaining which new IPs they’d need to whitelist, and sent regular reminders to ensure everything was ready on their end well before the migration date.
Testing in staging
With our communication plan in motion, we turned to testing the IP change in a staging environment.
In PostNL, we deploy our infrastructure as code, mainly with AWS CDK (Cloud Development Kit). Meaning we had to update the CDK Code of the egress VPC Stack to configure the NAT gateway.
The first challenge we encountered was the absence of BYOIP in our staging environment, which required us to use Amazon-provided IPs to validate the stack deployment.
We updated the NAT gateway to utilize the BYOIP addresses assigned by the network team (production only). Additionally, we implemented monitoring to track when connections exceed 80% capacity, triggering an alarm in these cases.
Below is a code snippet for creating the egress VPC and NAT gateway. We had to work around the limitations* of the CDK L1 construct that initially created the NAT gateway within the subnet.
*L1 constructs map directly to CloudFormation resources, so they don’t provide the convenience and abstraction that higher-level (L2 or L3) constructs do. This often means more verbose code and extra configuration steps.
private createEgressVpc() {
    const egressvpc =  new ec2.Vpc(this, 'egress', {
      maxAzs: 3,
      ipAddresses: ec2.IpAddresses.cidr('10.79.248.0/21'),
      enableDnsHostnames: true,
      enableDnsSupport: true,
      vpcName: 'EgressVpc',
      subnetConfiguration: [
        {
          cidrMask: 24,
          name: 'public-',
          subnetType: ec2.SubnetType.PUBLIC,
        },
        {
          cidrMask: 24,
          name: 'private-',
          subnetType: ec2.SubnetType.PRIVATE_WITH_EGRESS,
        },
        {
          cidrMask: 28,
          name: 'tgw-',
          subnetType: ec2.SubnetType.PRIVATE_WITH_EGRESS,
        },
      ],
    });

    // Allocate Elastic IPs
    const eip1 = this.node.tryGetContext(ContextProps.ELASTIC_IP1_SN1_ID);
    const eip2 = this.node.tryGetContext(ContextProps.ELASTIC_IP2_SN1_ID);
    const eip3 = this.node.tryGetContext(ContextProps.ELASTIC_IP1_SN2_ID);
    const eip4 = this.node.tryGetContext(ContextProps.ELASTIC_IP2_SN2_ID);
    const eip5 = this.node.tryGetContext(ContextProps.ELASTIC_IP1_SN3_ID);
    const eip6 = this.node.tryGetContext(ContextProps.ELASTIC_IP2_SN3_ID);

    // Associate Elastic IPs with NAT Gateway
    const subnet1 = egressvpc.node.tryFindChild('public-Subnet1');
    const subnet2 = egressvpc.node.tryFindChild('public-Subnet2');
    const subnet3 = egressvpc.node.tryFindChild('public-Subnet3');
    if (subnet1) {
      const natgateway1 = subnet1.node.findChild('NATGateway') as ec2.CfnNatGateway;
      natgateway1.allocationId = eip1;
      natgateway1.secondaryAllocationIds = [eip2];
      this.createNatGatewayAlarm(natgateway1, 'NatGateway1Alarm');
    }
    if (subnet2) {
      const natgateway2 = subnet2.node.findChild('NATGateway') as ec2.CfnNatGateway;
      natgateway2.allocationId = eip3;
      natgateway2.secondaryAllocationIds = [eip4];
      this.createNatGatewayAlarm(natgateway2, 'NatGateway2Alarm');
    }
    if (subnet3) {
      const natgateway3 = subnet3.node.findChild('NATGateway') as ec2.CfnNatGateway;
      natgateway3.allocationId = eip5;
      natgateway3.secondaryAllocationIds = [eip6];
      this.createNatGatewayAlarm(natgateway3, 'NatGateway3Alarm');
    }
    return egressvpc;
  }

  private createNatGatewayAlarm(natGateway: ec2.CfnNatGateway, alarmName: string) {
    const natgatewayAlarm = new cw.Alarm(this, alarmName, {
      metric: new cw.Metric({
        namespace: 'AWS/NATGateway',
        metricName: 'ActiveConnectionCount',
        dimensionsMap: {
          NatGatewayId: natGateway.ref,
        },
      }),
      threshold: parseInt(this.node.tryGetContext(ContextProps.NATGW_CONNECTION_LIMIT)),
      evaluationPeriods: 2,
      comparisonOperator: cw.ComparisonOperator.GREATER_THAN_THRESHOLD,
    });
    const topic = sns.Topic.fromTopicArn(this,
      `${alarmName}-topic`,
      this.node.tryGetContext(ContextProps.OPSGENIE_TOPIC));
    natgatewayAlarm.addAlarmAction(new cwactions.SnsAction(topic));
  }
}
When deploying the stack we always perform a pre-run to check how the resources are affected by the deployment. To our surprise, we noticed that the NAT Gateway was recreated after the deployment in the staging environment.
lpe-network-egress-vpc |  0/15 | 2:38:59 PM | UPDATE_IN_PROGRESS   | AWS::EC2::NatGateway                  | VPC/egress/public-Subnet3/NATGateway (VPCegresspublicSubnet3NATGatewayE9F63C73) Requested update requires the creation of a new physical resource; hence creating one.
lpe-network-egress-vpc |  0/15 | 2:38:59 PM | UPDATE_IN_PROGRESS   | AWS::EC2::NatGateway                  | VPC/egress/public-Subnet2/NATGateway (VPCegresspublicSubnet2NATGatewayB0013E1E) Requested update requires the creation of a new physical resource; hence creating one.
lpe-network-egress-vpc |  0/15 | 2:38:59 PM | UPDATE_IN_PROGRESS   | AWS::EC2::NatGateway                  | VPC/egress/public-Subnet1/NATGateway (VPCegresspublicSubnet1NATGateway83F480B7) Requested update requires the creation of a new physical resource; hence creating one.
lpe-network-egress-vpc |  1/15 | 2:38:59 PM | UPDATE_COMPLETE      | AWS::CDK::Metadata                    | CDKMetadata/Default (CDKMetadata)
What happened was that CloudFormation started to create new NAT Gateways, did an update on the routing tables, and started removing the old NAT Gateways.
We knew this would lead the PostNL connectivity to a short downtime.
While we were deploying this we also ran some tests to check the connectivity to the internet from different accounts and that kept working, although it was delayed. A normal check lasted 11 seconds and now it took over a minute. So we raised a Support ticket to AWS to check if it was possible to do the update without downtime. The response from AWS was the following:
“I have been through the latest response as well and could observe that you have already performed a test on the test-environment and have some results, on which I would like to inform that, you cannot change primary IP of your NatGatway after creating it.
- You can create a new NAT gateway: When you create the NATGW, you have the option to choose a specific EIP allocation and so you can use the EIP from the range mentioned.
And as per the recommendation, this should be performed in the maintenance window as it would require some downtime to update the route tables accordingly.”
We received confirmation from AWS that it was not possible to do it without downtime, so a maintenance window had to be scheduled.
Maintenance window
Looking at the usage of our existing NAT Gateway we could not find a slot with no concurrent connections. The least amount of connections we could find were 20000 active connections. So again we reached out to the #include team to ask them what would be a time slot in which we would minimize the impact on the API Management Platform and the business. We decided to perform the change at 23:00 on a Monday.
Migration day
At the agreed date and time, we started the deployment. Since we were expecting downtime and we were not sure of the length of it we asked the #include team to be on standby to monitor the connections. Since we were changing the public addresses of the NAT gateways we were expecting that a few endpoints did not update the whitelisting and would give an issue. We did have a way to revert the change but if we wanted to roll back we wanted to do this as close to the change as possible and only if things stopped working.

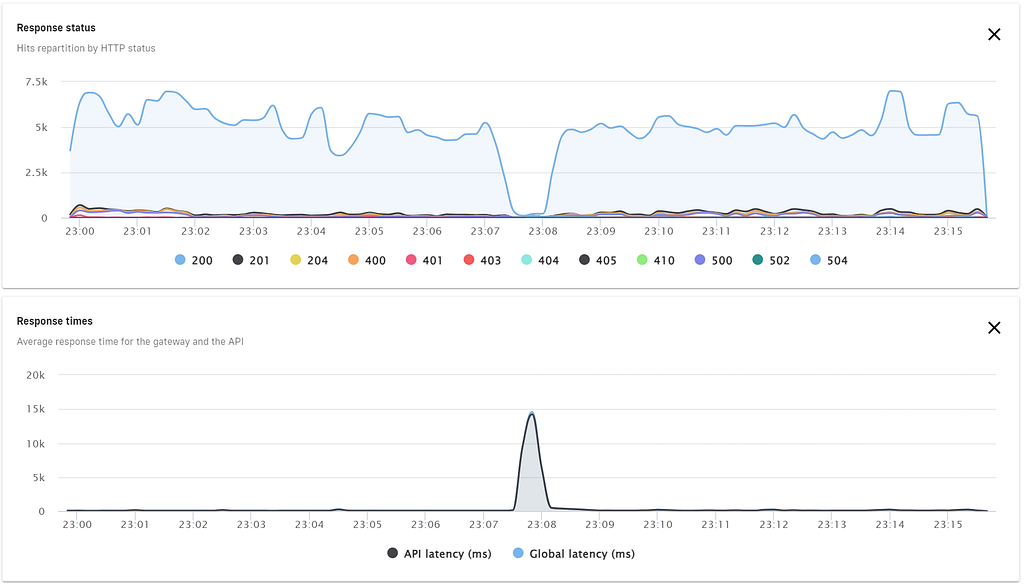
The monitoring of the #include team indicated a downtime of 40 seconds resulting in additional latency on the graph. The most important API’s had some health checks configured and we still had a lot of concurrent sessions active on the NAT gateways. The result was that 5 out of the +/- 400 APIs stopped working and those were not the most critical APIs so we decided to roll forward and ask the endpoints that stopped working to fix the whitelisting the next morning.
Post-migration analysis
The next morning the API team contacted the parties that were managing the endpoints that were down.
As expected, some parties were using whitelisting on the old IP addresses. The #include team was able to fix 5 out of the 6 quite fast by helping our partners update the whitelisting, but the remaining one was an edge case to our surprise:
A-symmetrical routes
The 5th API did not have a whitelist implemented. The endpoint was hosted on an AWS account and together with the CSP we looked at the routing table and discovered that there was an a-symmetrical route configured in the subnet that the endpoint was created in.
Updating the route table with a more specific route towards the internet gateway fixed that issue. The last remaining endpoint was hosted by a CSP on Azure and that party did not implement a whitelist so we also figured it would also be an asymmetric route that was blocking the return traffic and that was the case. When the route table was updated the API’s were able to connect again.

Lessons learned
Changing central network components is not an easy task, since it is not always known which team will be impacted by a change.
Reflecting on the process, communication was key — getting everyone on board early made a massive difference. Testing in a more realistic environment paid off, giving us a good sense of potential downtime and other impacts.
Solving the errors went smoothly, however, detecting some of the errors took some time since not all APIs are issued 24/7. The #include team has also addressed health checks among the API owners inside the API Management Platform.
Although the a-symmetrical routing setup is solved, it should not have been implemented in the first place as it is redundant according to the PostNL setup.
Conclusion
By transitioning to BYOIP, we aimed to save on costs and gain more control over our network.
PostNL is now using BYOIPs on the centralized egress NAT gateways. This had an immediate cost reduction on IP addresses (public AWS IP = $0.005 per hour), and since we disabled the advanced tier for now we could not share IP addresses with other accounts. Unfortunately, that didn’t give us the cost savings we were hoping for. We could have saved a maximum of 664 AWS public IPs, saving $2423,60 a month. Since the cost of enabling IPAM was $3720, it wouldn’t be worth doing it.
Adding the additional IP addresses to our NAT gateway also allows us to centralize the egress traffic for CSPs saving 35 euros per NAT gateway per month (CSPs are using 3 NAT gateways per account). Meaning that savings will increase over time.
Centralizing all egress traffic from VPCs to the internet also allows PostNL to be in control of the traffic (e.g. manage IP address allocation, maintain consistent IP addresses across environments, and improve traffic routing and security settings).
We also built a playbook for future network migrations. With each team doing their part, we were able to create a smoother, more resilient setup — and everyone came out stronger for it.
Co-authored by Gideon Vrijhoeven
PostNL’s Journey to BYOIP on AWS: Managing Costs and Control with Custom CIDR Ranges was originally published in PostNL Engineering on Medium, where people are continuing the conversation by highlighting and responding to this story.
